Job Roles
When filming, specific roles have been ascribed to the group.
The role I have taken on is Sound and Lighting, something that I have not approached before and will therefore research thoroughly.
The other roles allocated are:
Mise-en-Scene
When filming, specific roles have been ascribed to the group.
The role I have taken on is Sound and Lighting, something that I have not approached before and will therefore research thoroughly.
The other roles allocated are:
Mise-en-Scene
Mise-en Scene is often described as everything seen on set or on stage.
Mise-en-Scene will create the set designs, as well as design what the actors will wear. It'll be their job to organise props for each scene and provide everything that is needed.

Director
The director will organise the script and shooting schedule, as well as tell the actors how and what they need to do.
 Cameraman
The Cameraman will be in control of the shot list, as they will organise how each scene will be filmed in order to suit the directors needs. To the left, is a Sony PD150, the camera in which will be used to film.
Lighting
Lighting is often described as one of the most crucial parts of filming, as it is the lighting as well as the sound which can effect the whole atmosphere of a scene. Within Lighting comes great responsibility and an excellent understanding of health and safety. As electrical lighting aids can be extremely dangerous if not set out correctly and safely. To the right, is a pro light, which will be used in filming.
Lighting Equipment
18% Gray Card A grey-coloured card which reflects 18% of the light which falls upon it. Used as a reference to calibrate light meters and set exposure.
Consoles - Software which is used to control lighting.
Light Metre - Used to measure lighting.
Gels - Materials placed in front of lighting to alter the colour and mood of a scene. Lighting Gels are useful to affect the atmosphere of a scene. I found them especially good by using blue gels to give the scene a morning appearance.
Stands and Clamps - Apparatus that is used to support lighting.
18% Gray Card A grey-coloured card which reflects 18% of the light which falls upon it. Used as a reference to calibrate light meters and set exposure.
Consoles - Software which is used to control lighting.
Light Metre - Used to measure lighting.
Gels - Materials placed in front of lighting to alter the colour and mood of a scene.
 Lighting Gels are useful to affect the atmosphere of a scene. I found them especially good by using blue gels to give the scene a morning appearance.
 Stands and Clamps - Apparatus that is used to support lighting.
Lowell Pro Lights and Red Heads
The Lowell Pro Lights gives a slightly softer light than red heads, this will therefore make it easier on the actors when filming. As too-bright lighting can be blinding. Around the light, Pro Lights are considered light weight and simple to manoeuvre, after practice I found this to be true. The Lowell Pro Lights are perfect for concentrating on one character, used in scenes where the focus of the camera is on one individual. Attaching Lowell Pro Lights to their stands is a quick and easy job without hassle.
 However, Red head lights (at the left) give harsher and brighter lighting. Appropriate for filming scene with a large amount of characters or a large set to fill. Red Heads tend to be bulkier than Lowell Pro Lights making them harder to use and manoeuvre thus, adding more time to time spending set up.
 The Lowell Pro Lights are perfect for concentrating on one character, used in scenes where the focus of the camera is on one individual. Attaching Lowell Pro Lights to their stands is a quick and easy job without hassle.
 However, Red head lights (at the left) give harsher and brighter lighting. Appropriate for filming scene with a large amount of characters or a large set to fill. Red Heads tend to be bulkier than Lowell Pro Lights making them harder to use and manoeuvre thus, adding more time to time spending set up.
 Common lighting Terminology
Ambient Light - Natural lighting that is already in the scene without having anything added. This type of lighting will be useful in my film project as I want it to be fairly naturalistic, and therefore using ambient lighting will keep the scene looking fairly normal and not too exaggerated.
Incident Light - Light coming directly from a source, such as a lamp. This Lighting will definitely be used, particularly in the scenes when Amelia, is sitting alone in her bedroom, as her main light source is the lamp on her desk, which will make her room appear dark and dull.
Reflected Light - Light that comes from a surface, as it is reflected from another source. This type of lighting has not been planned, but may become more of an issue to avoid rather than a source.
Colour Temperature - Is the way in which lighting is measured, this will be taken into further detail later.
Contrast Ratio - The difference between the brightest and the lightest in the image.
Key Light - Main light used on a subject.
Fill Light - The light placed to the side of the subject, which will fill out the shadows and balance out the key light.
Back Light - A light placed behind the subject to light from the rear.
Hard Light - Light which shines undisturbed from its source directly, e.g. the sun.
Soft Light - Produces less shadows which aren't as strong, appears to "wrap around" a subject.
Spot - Narrow beam of light that is being controlled onto the subject.
Flood - Much broader than a spot and less directional and controlled.
Three Point Lighting
One of the most basic lighting techniques is called three point lighting.
The three points in order of usage are; Key, Fill and Back.
Key lighting is the most used, usually to display the front left side of the subject casting shadows behind and to the right. Fill lighting will usually be to the left casting shadows behind.back lighting will of course eliminate any shadows. If only the back lighting is on, only the outline of the subject can be seen, which creates an eerie effect.

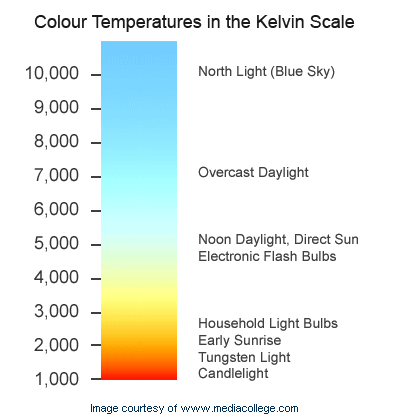
Colour Temperature
A colour temperature is defined as a characterisation of the spectral properties of a light source and is commonly used during the production phase in the film and photography industries. To simplify things, if the light is a low colour temperature then it will be warmer and a yellow to red colour. Whereas if a light is a higher colour temperature it is cold and more blue.
Colour Temperatures are measured in Kelvins (K)
The main light source that will be found in the short film I am making is an ordinary room light bulb. This will be to keep lighting realistic. The Kelvin measurement for a standard room light bulbs is measured at 2500k.
Secondly for the outdoor scenes, the following measurements can be used; an overcast sky is 10,000 k and outside on a sunny day is roughly 6000 k.
The definition and calculations above where found on the website http://www.webopedia.com/TERM/C/color_temperature.html at 18.10 on Sunday 17th January 2010. The Author was unnamed.

This image was found at : http://www.mediacollege.com/lighting/colour/images/colour-temperature.gif at 18.21 on January 17th 2010, Author unnamed.
By using lighting the job roles I will have are as follows:
- Organising appropriate lighting for each scene
- Designing the lighting in each scene to create the atmosphere for the scene.
- Drawing out a technical recce as well as a thorough risk assessment
The main lighting used in the film, is just forward key lighting which will illuminate the characters. It will only be this lighting to keep scenes naturalistic.
Each day of my film starts in either the kitchen or bedroom of the character Amelia. Using lighting I will make it appear as though it is early morning, this will be accomplished with blue gels, to give the look of a dreary early morning.
However, in the evenings when Amelia is alone, working in her bedroom a thin red gel will be used to connote anger and frustration. Each evening the red will get stronger to reveal her inner mind and how she is feeling. For shots at school, no gels are needed, as the natural lighting from filming during the day will be accomplished. Furthermore, by not using gels it allows the school to have neutral tones. That will therefore show, that her mornings are calm (blue gel), her days are neutral (no gel) and in the evening she begins to get frustrated (red gel), which connotes how she is feeling.
To achieve the best sound quality when filming, microphone booming will be used. Booming is when the microphone is attached to a long pole (called a boom pole) of between12 and 18 feet by a shockmount. The person controlling the boom is called the "Boom Operator". The shock mount is holds the mic in a rubber band mechanism which stops vibration from travelling up the pole to the mic. This could alter the sound.
The Boom Operator which will be me, has to hold the pole either above or below the actors to record their sound. To hear adequately I must wear headphones, to detect any background noise which is interfering with the sound. With booming comes "The Rule Of The Thumb" which means that the boom must be as close to the actors as possible without being seen in the film. As the further away from the intended sound the more background noise will get in which will interfere. The mic is usually held a minimum of two feet above the head, however if this area is obstructed booming from below may be used. Booming allows several actors voices to be recorded which makes it a favoured technique.However, when using the mic from below the sound will not be as clear and sound more bassy as it picks up sound from the chest cavity. Furthermore, as the mic is closer to the hands any noise made from hand gestures will be picked up and may go over dialogue.
We will be using Booming in our film, as firstly it is the equipment made available to us and secondly it is referred as the most favoured technique for its ability to record dialogue well. There are two different ways of holding a boom: by being attached to a large pole, or by pistol gripping. 

When attached to the pole, the boom can be held up above the actors when they are talking, which allows the camera to get a wide angle shot without seeing the boom. Sometimes the microphone however, may be used via Pistol Grip (See Right), which is when the pole is taken off and just the Microphone is used as a hand held. This can be easier as it is not as heavy and therefore easier on filming longer scenes. This type of booming can only be used on close up scenes which do not contain too much dialogue, as the Boom always needs to be close to the dialogue speaker.
This is the outside casing which holds the microphone. The casing is referred to as a Modular Windshield, it surrounds the microphone protecting it, as well as preventing any unwanted wind sounds.

 Filming outdoors requires a boom Windjammer, the Windjammer is a synthetic fur cover which stops wind from interrupting sound. Inside the Windjammer is the modular windshield which holds the Mic. The Mic is held inside a Modular suspension which cradles the Mic precenting any interruption from sound waves or vibrations.
Here is the Modular Suspension; this holds the microphone in place inside the basket. It allws the microphone to stay still which protects it from damage as well as allowing perfect sound.

Information found on http://www.rycote.com/products/families/ 18th March 2010
No comments:
Post a Comment